Tips

Following eyes in 3-D anaglyph

My eyeballs are watching you, and you cannot escape their unblinking gaze. Go ahead, move to the left or right. Get up and walk away. Wherever you go, their pupils will still aim right at you.

One of the neat properties of 3-D anaglyphs which the artist can exploit is that anything that points at the viewer will "follow" the viewer at any perspective. You can also see this effect at work in my converted TV Guide cover; Miley Cyrus will point right at you wherever you happen to go.

| | Comments (0)

WIMMER'S OPTIMIZED ANAGLYPH METHOD:

Optimized Club Penguin 3-D

NORMAL COLOR ANAGLYPH METHOD:

Normal Club Penguin 3-D

Peter Wimmer, of 3dtv.at, describes this modified algorithm for making color anaglyphs, which he calls "Optimized Anaglyph." Wimmer's method actually discards all of the red component from the original images, and replaces it with a sort of fake red channel derived from the green and blue components.

If you are now wondering what that means in layman's terms, I'm sorry. Those were the layman's terms. In technical terms, Wimmer's Optimized Anaglyph does this:

Optimized Anaglyph Formula

The Optimized anaglyph will obviously not reproduce colors as truly as a normal color anaglyph. But what you get in return is a dramatic reduction in ghost images and in "retinal rivalry," the extreme color contrast that makes your eyeballs hurt.

Wimmer gives five examples of photos so you can compare the methods. But I wanted to give his algorithm a real challenge, so I tested it on my Club Penguin 3-D screen shot, which I posted last week. Because of the highly saturated primary colors in this image, the retinal rivalry was severe. Could Wimmer's method cure the eye strain, without totally destroying the colors? Judge for yourself.

| | Comments (0)

declaration_depth.jpg

Starting with the famous John Trumbull painting of the signing of the Declaration of Independence, I turned it (or a detail from it, anyway) into a 3D anaglyph by using a "depth map" as a displacement map in Photoshop.

declaration_flat.jpg   decalaration_depth_map.jpg

The "depth map" is a separate file the same size as the flat image, with various shades of gray to indicate the depth of every part of the image. White is closest, black is farthest. Using this as a displacement map in Photoshop on the flat image -- with a negative X offset for the red channel and a positive X offset for the green and blue channels -- turns it into a 3D anaglyph.

| | Comments (20)

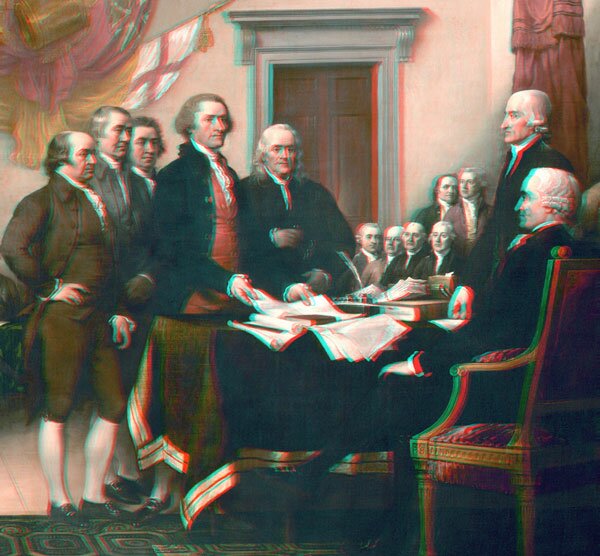
When I made the header art for this site, I knew just the photograph I wanted: an attractive woman wearing red-and-blue glasses, looking at the logo, expressing both surprise and happiness. And the photo had to be in 3-D. As you can see at the top of this page, I got just what I wanted. But I didn't find what I wanted; I had to make it.

original_girl.jpg

Here's what I found: a stock photograph by Sharon Dominick, on iStockphoto.com. (And by the way, if you're not buying your stock photos from iStockphoto, you are wasting money. Go sign up with iStockphoto, or you're fired.)

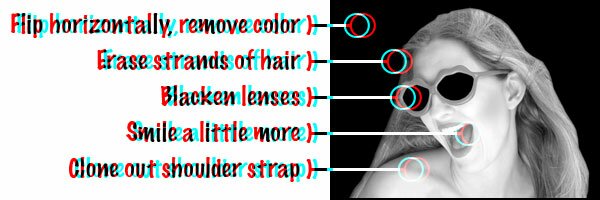
I could tell right away that -- besides facing the wrong way, and looking in the wrong direction, and not wearing 3-D glasses, and having hair blowing everywhere, and being only two-dimensional -- this girl was perfect. Simply perfect. Well, she wasn't quite happy enough, either. But perfect besides that. So I bought the photo.

To fix the parts that wouldn't work with my layout, I retouched the photo. I flipped the image so she faced leftwards, erased some of her hair, blacked out the lenses of the glasses, cloned out her shoulder strap, and pulled her mouth ever-so-slightly into a happier smile.

retouched_girl.jpg

That was the easy part. But she still wasn't in 3-D. Usually, you make a 3D photo by using two separate images shot from slightly different angles. But how do you make a 3D photo from a single flat image?

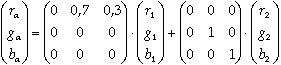
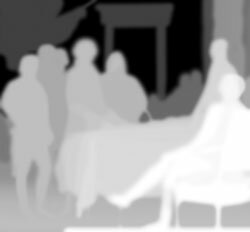
I did it by making a layered Photoshop file. Each layer contained just a little less of the image than the one below it. The bottom layer had the whole portrait; the next layer, just the head; the next layer, the chin and face; and so on, until the top layer just had her nose and glasses.

layers_girl.jpg

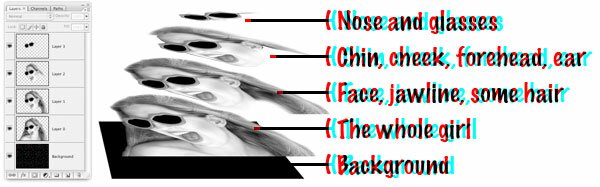
The trick here is to feather the edges of your eraser just right. If you use hard edges everywhere, the edges of your layers will show up in the 3D image, and make her look like she's made of construction paper. In most places, you want to use feathered edges to make smooth transitions from one layer to the next. But in some places, you want a hard edge, for a sharp transition (such as where her glasses appear in front of her hair).

After that, I made a copy of every layer so I had two full sets. I colored one of these sets red and the other cyan, and moved the layers to simulate the two different viewing angles. Merging them into one anaglyph image gives me this:

finished_girl.jpg

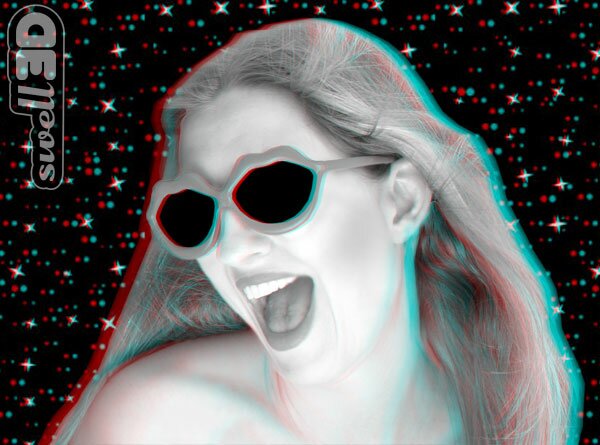
For my header art, I colored her lenses blue and red, but I reckon I'll leave them black here. She looks pretty cool.

No matter how hard you work at it, you'll never turn it into a true stereoscopic photo. But you can come pretty close, probably close enough to fool most people, especially if you plan to use it at a smaller size, such as in my header.

| | Comments (2)

Tips

This page is an archive of recent things in the Tips category.

You can see all of the Swell 3D categories listed below, in this sidebar.

Find recent things on the Home Page, or look in the Archives to see everything ever posted to Swell 3D.

  • Subscribe to feedSubscribe to this blog's feed
Powered by Movable Type 5.01